From Code to CDN for Free: The Architecture Behind This Website
From Code to CDN for Free: The Architecture Behind This Website
When I decided to build a personal website with a blog, portfolio, and career timeline, I wanted full control without a monthly bill. Most website platforms charge $15-50/month for features I could assemble myself using free-tier services. Here's how I built a production-grade site with a CMS, global CDN, and automatic deployments - for exactly $0/month.
The Full Architecture
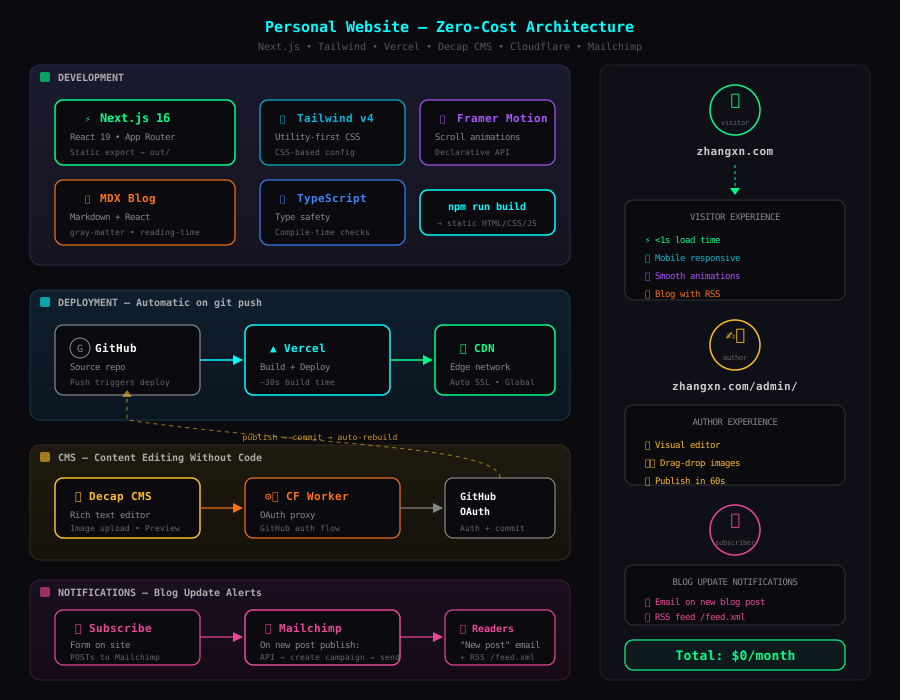
The stack has three layers:
Development - Next.js 16 with App Router, Tailwind CSS v4 for styling, Framer Motion for scroll-triggered animations, and MDX for blog posts (Markdown with embedded React components). TypeScript throughout for type safety.
Deployment - Every git push to GitHub triggers an automatic build on Vercel. The site compiles to plain static HTML/CSS/JS and is served from Vercel's global CDN with automatic SSL. No servers to manage.
CMS - Decap CMS provides a web-based editor at /admin/ for writing blog posts, editing page content, and managing media - without touching code. Authentication flows through a Cloudflare Worker that handles GitHub OAuth.
The CMS: How Non-Technical Editing Works
A common assumption is that you need a paid platform to get a visual content editor. That's not true. Decap CMS (formerly Netlify CMS) is an open-source, single-page React app that provides a full editing UI - rich text, image uploads, live preview - and commits content directly to your Git repository.
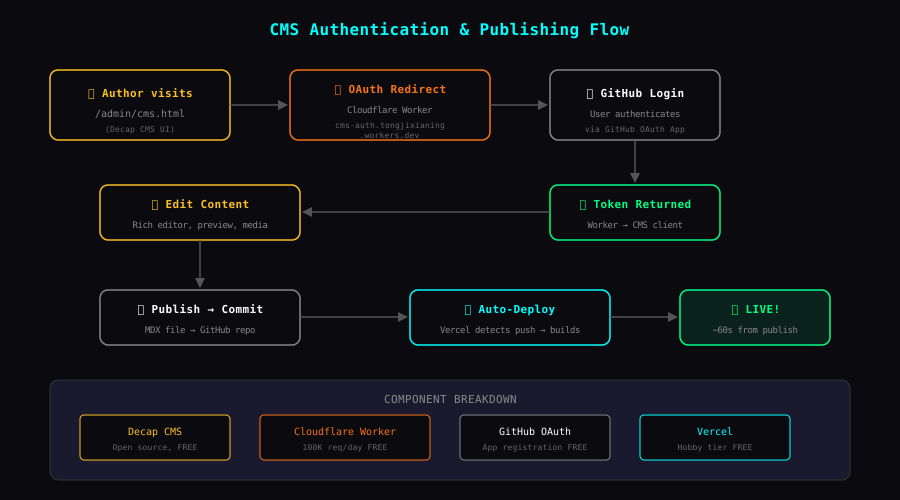
The Components
| Component | Role | Cost |
|---|---|---|
| Decap CMS | Open-source React app served as a static page (/admin/cms.html) | Free |
| Cloudflare Worker | OAuth proxy - handles the GitHub OAuth dance, returns access token to CMS | Free (100K requests/day) |
| GitHub OAuth App | Registered app that grants repo access for committing content | Free |
| Vercel | Detects new commits, rebuilds site, deploys to CDN | Free (hobby tier) |
Publishing Flow
- Author visits
zhangxn.com/admin/- loads Decap CMS UI - CMS redirects to Cloudflare Worker for authentication
- Worker initiates GitHub OAuth flow - user logs in with GitHub
- Worker receives auth code, exchanges for access token, returns to CMS
- Author edits content in a rich editor with live preview
- On "Publish" - CMS commits the MDX file directly to the GitHub repo
- Vercel detects the push, rebuilds the static site (~30 seconds)
- New content is live on the CDN
Total time from edit to live: ~60 seconds. No FTP, no database, no manual deployment.
Deep Dive: How the Cloudflare Worker OAuth Proxy Works
This is the most interesting piece of the architecture. GitHub OAuth requires a server-side component because the token exchange involves a client_secret that must never be exposed to the browser. Traditionally, you'd need a backend server for this - which means paying for hosting. A Cloudflare Worker solves this elegantly: it's a serverless function that runs at the edge, costs nothing on the free tier, and handles the entire OAuth handshake.
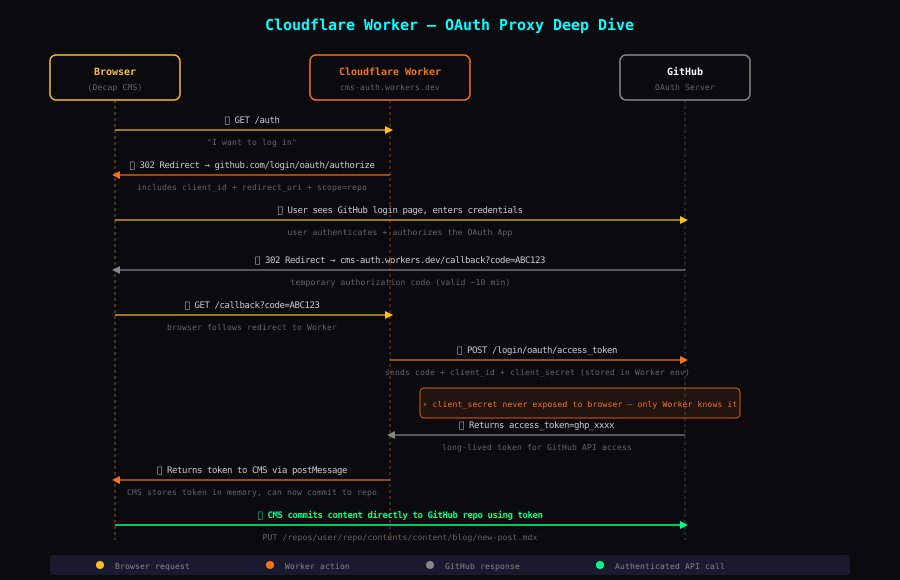
The OAuth Dance Step by Step
Phase 1: Initiate - When the CMS needs to authenticate, it redirects the browser to the Worker's /auth endpoint. The Worker responds with a 302 redirect to GitHub's authorization URL, including the client_id and requested scopes (repo access for committing files).
Phase 2: User Authenticates - The user sees GitHub's login page and authorizes the OAuth App. GitHub then redirects back to the Worker's /callback endpoint with a temporary authorization code.
Phase 3: Token Exchange - This is the critical step that requires a server. The Worker takes the temporary code and sends it to GitHub's token endpoint along with the client_secret (stored securely as a Worker environment variable). GitHub validates the code + secret combination and returns a long-lived access token.
Phase 4: Return to CMS - The Worker passes the access token back to the CMS client via postMessage. The CMS stores it in memory and can now make authenticated API calls to GitHub - creating commits, uploading images, and managing content.
Why This Architecture is Secure
The client_secret lives only in the Cloudflare Worker's environment variables - never in the browser, never in source code
The temporary authorization code is single-use and expires in 10 minutes
The access token is scoped to only the permissions the OAuth App requests
No credentials are stored in the static site files
The Complete Worker Code
The entire OAuth proxy is a single file - no framework, no dependencies, no database. Just two routes:
export default {
  async fetch(request, env) {
    const url = new URL(request.url);    // Route 1: Redirect to GitHub OAuth login
    if (url.pathname === '/auth') {
      const params = new URLSearchParams({
        client_id: env.GITHUB_CLIENT_ID,
        scope: 'repo,user',
        redirect_uri: url.origin + '/callback',
      });
      return Response.redirect(
        'https://github.com/login/oauth/authorize?' + params, 302
      );
    }    // Route 2: Exchange temp code for access token
    if (url.pathname === '/callback') {
      const code = url.searchParams.get('code');
      const tokenResp = await fetch(
        'https://github.com/login/oauth/access_token', {
        method: 'POST',
        headers: {
          'Accept': 'application/json',
          'Content-Type': 'application/json'
        },
        body: JSON.stringify({
          client_id: env.GITHUB_CLIENT_ID,
          client_secret: env.GITHUB_CLIENT_SECRET,
          code,
        }),
      });
      const data = await tokenResp.json();
      const token = data.access_token;      if (!token) {
        return new Response('OAuth failed', { status: 400 });
      }      // Return HTML page that sends token to CMS via postMessage
      // The script communicates with the parent CMS window
      return new Response(htmlWithPostMessage(token),
        { headers: { 'Content-Type': 'text/html' } }
      );
    }    return new Response('Not found', { status: 404 });
  },
};
Here's how each part maps to the OAuth flow:
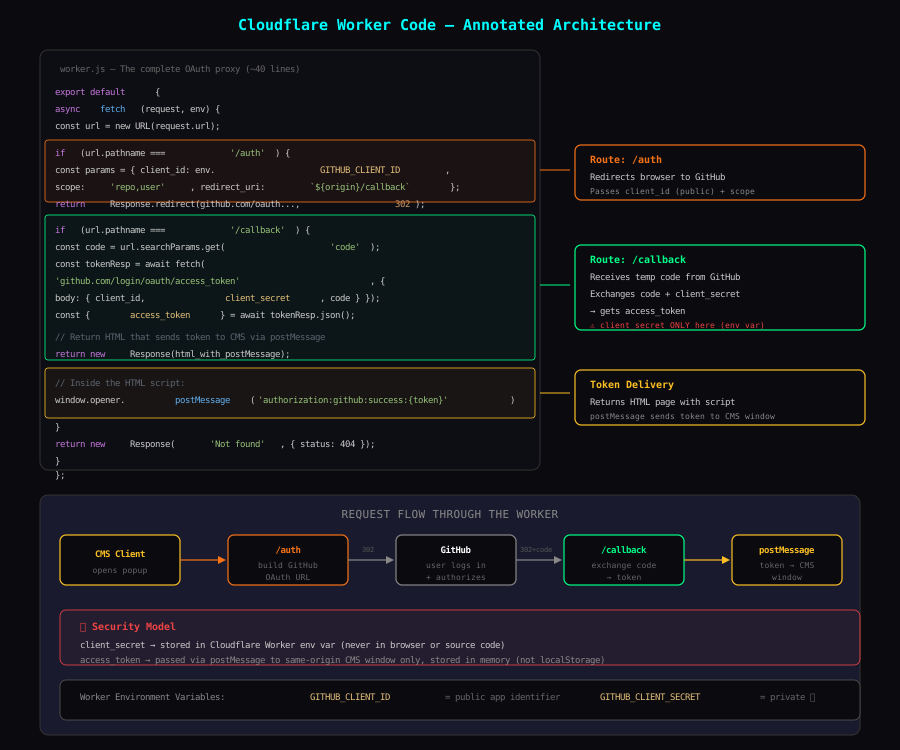
/auth route - The entry point. When Decap CMS opens a popup for login, it hits this endpoint. The Worker builds a GitHub OAuth URL with the client_id (public, safe to expose) and the requested permissions (repo for committing files, user for identity). It then redirects the browser to GitHub's login page.
/callback route - After the user logs in on GitHub, GitHub redirects back here with a temporary code. This is where the magic happens: the Worker sends this code along with the client_secret (stored securely in Cloudflare's environment variables, never exposed to the browser) to GitHub's token endpoint. GitHub validates the combination and returns a long-lived access_token.
postMessage delivery - The Worker can't just return the token as JSON because the CMS is running in a different window (the popup pattern). Instead, it returns a small HTML page with a script that uses window.opener.postMessage() to send the token back to the parent CMS window. This is the standard Decap CMS authentication protocol.
Environment variables - The two secrets (GITHUB_CLIENT_ID and GITHUB_CLIENT_SECRET) are configured in the Cloudflare dashboard under Worker Settings → Variables. They're encrypted at rest and only accessible to the Worker runtime - never in source code, never in the browser.
Cost Comparison
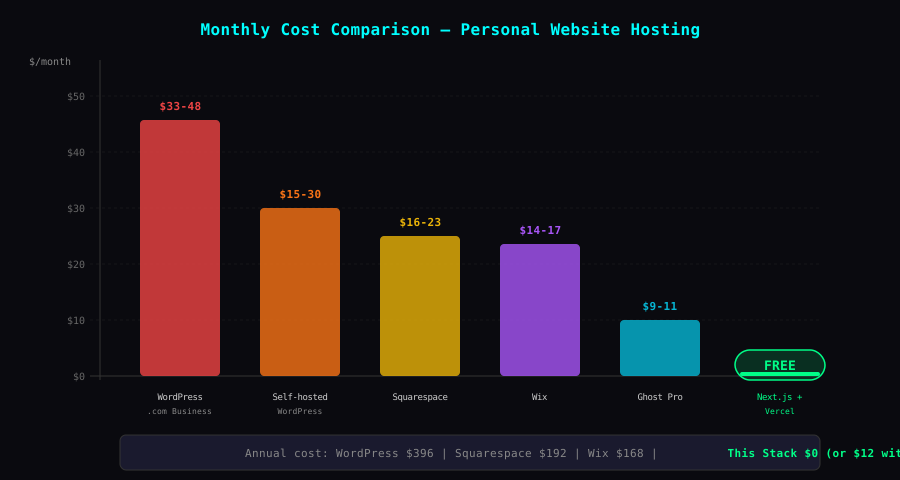
Most website platforms charge monthly fees that add up quickly. Here's what the market looks like versus this stack:
| Service | Free Tier Limit | My Usage |
|---|---|---|
| Vercel | 100GB bandwidth/month | ~1GB |
| GitHub | Unlimited public repos | 1 repo |
| Cloudflare Workers | 100K requests/day | ~10/day |
| Decap CMS | Open source | Self-hosted |
.vercel.app subdomain works fine without one.What About AWS?
AWS markets a "Free Tier for Web Apps" - but it's not the same as truly free hosting.
| AWS Service | Free Tier | After 12 Months |
|---|---|---|
| Amplify Hosting | 1,000 build min/mo, 15GB served | ~$0.15/GB + $0.01/build min |
| Lightsail (WordPress) | 3 months free | $3.50–5/month |
| S3 + CloudFront (static) | 5GB + 1TB CDN | Pay per request + storage |
| Route 53 (DNS) | Not free | $0.50/zone/month |
| Lambda (serverless) | 1M requests/mo | $0.20 per 1M after |
Most free tiers expire after 12 months - then you're paying Infrastructure overhead - you manage S3 buckets, CloudFront distributions, IAM policies, SSL certificates, build pipelines No built-in CMS - you'd still need to set one up yourself Billing surprises - a traffic spike or misconfigured resource can generate unexpected charges
AWS Amplify is the closest competitor to Vercel for static hosting, but even it requires more configuration and has a less generous permanent free tier.
| Feature | AWS (Amplify) | This Stack (Vercel) |
|---|---|---|
| Permanent free tier | Limited | Yes (100GB/mo) |
| Auto-deploy from Git | Yes | Yes |
| Custom domain SSL | Manual config | Automatic |
| Build config | amplify.yml needed | Zero config |
| CMS integration | DIY | Decap CMS (ready) |
| Infrastructure management | You manage it | None |
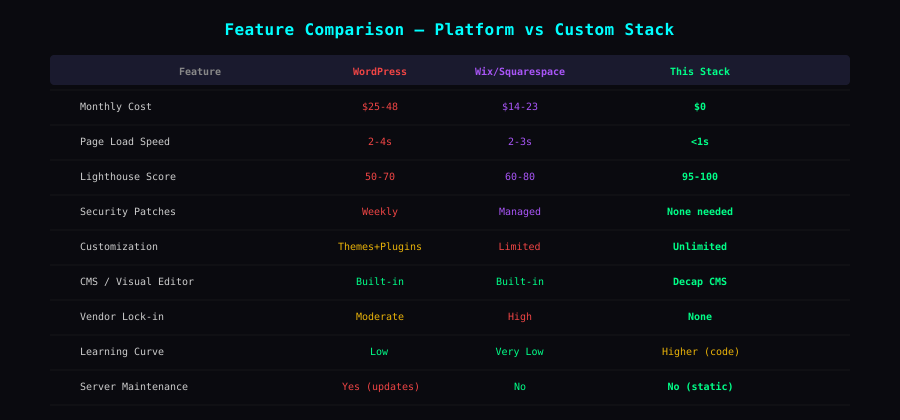
Feature Comparison
Where This Stack Wins
Performance - Static HTML served from CDN edge nodes. No server-side processing, no database queries at request time. Lighthouse scores consistently 95-100. Security - No attack surface. No database to SQL-inject, no admin panel to brute-force, no plugins with vulnerabilities. It's just HTML files on a CDN. Zero maintenance - No software updates, no plugin conflicts, no version upgrades, no database backups. Deploy and forget. Full ownership - Content lives as Markdown files in Git. Move to any host anytime. No vendor lock-in.
Where Paid Platforms Still Make Sense
To be fair, paid platforms are better when:
Multiple non-technical editors need a familiar drag-and-drop GUI You need built-in e-commerce You need dozens of plugins out of the box (memberships, forums, LMS) You want to be live in 30 minutes without any coding
For a developer's personal site - where you want speed, control, and zero cost - the static stack is the clear winner.
Email Subscriptions & Notifications
The site includes a subscriber notification system - visible in the architecture diagram above as the bottom layer. When a new post is published, subscribers get an email automatically.
Subscribe form - A simple HTML form that POSTs directly to Mailchimp's endpoint. No backend server needed. A hidden honeypot field catches bots.
Mailchimp - Manages the subscriber list and sends campaigns. Free tier supports up to 500 subscribers - more than enough for a personal blog.
Notify script - A Python CLI script (notify-subscribers.py) that reads the post's frontmatter, creates a Mailchimp campaign via their REST API, and sends it to all subscribers. Run it after publishing:
python3 notify-subscribers.py building-personal-website-zero-cost
RSS feed - Auto-generated at build time (/feed.xml) from all MDX posts. Subscribers who prefer RSS readers get updates without email.
The full publishing pipeline:
Write post → git push → Vercel deploys → notify script → email sent
                                        → RSS feed updated
Replicating This Setup
If you want the same stack:
- Next.js + Tailwind v4 -
npx create-next-appwith TypeScript - Static export - set
output: "export"innext.config.ts - Blog - MDX files in
content/blog/with gray-matter frontmatter - CMS - Add Decap CMS (
/admin/cms.html+config.yml) - Auth - Deploy a Cloudflare Worker for GitHub OAuth proxy
- Subscribe - Mailchimp free tier + direct form POST + notify script
- Host - Connect GitHub repo to Vercel (Framework: "Other", Output: "out")
- Domain - Optional: add custom domain in Vercel settings
Every piece is free, open-source, and replaceable. No lock-in anywhere.
Summary
| Metric | Value |
|---|---|
| Monthly hosting cost | $0 |
| Page load time | Under 1 second |
| Lighthouse score | 95-100 |
| Security patches needed | 0 |
| Server maintenance | None |
| Time to deploy changes | ~60 seconds |
| CMS for content editing | Yes (Decap) |
| Email subscriptions | Yes (Mailchimp free) |
| RSS feed | Yes (auto-generated) |
| Vendor lock-in | None |
No databases were harmed in the making of this website.